
| Page: |
| Home > Show Us Yours! > Project "Marginal gains..." | |||||||
 2094 Posts Member #: 9894 Post Whore Dorking |
22nd Oct, 2015 at 07:27:32pm
Found something for you.
|
||||||
 834 Posts Member #: 2017 Post Whore Warwick. |
23rd Oct, 2015 at 12:05:27pm
There was a guy on TMF who made a few of them aluminium cosmic arches
David. |
||||||
 690 Posts Member #: 9962 Post Whore |
24th Oct, 2015 at 07:21:56am
Cheers Jonny,
|
||||||
|
690 Posts Member #: 9962 Post Whore |
4th Nov, 2015 at 02:24:58pm
Jigging to get things in the correct place.
Edited by Aubrey_Boy on 17th Oct, 2017. |
||||||
 76 Posts Member #: 9169 Advanced Member Cape Town, South Africa |
5th Nov, 2015 at 05:15:24pm
Always a highlight to my daily visit to the forum when I get to see there is an update to your build. Very impressive the details and engineering that's going into this. |
||||||
|
690 Posts Member #: 9962 Post Whore |
6th Nov, 2015 at 03:33:38pm
Cheers Dion,
|
||||||
|
2094 Posts Member #: 9894 Post Whore Dorking |
6th Nov, 2015 at 04:52:08pm
On 5th Nov, 2015 dion said:
Always a highlight to my daily visit to the forum when I get to see there is an update to your build. Very impressive the details and engineering that's going into this. Ditto! |
||||||
|
690 Posts Member #: 9962 Post Whore |
7th Nov, 2015 at 06:42:20pm
Thanks Jonny,
|
||||||
|
690 Posts Member #: 9962 Post Whore |
15th Nov, 2015 at 09:19:11pm
So I've decided where the fuel cell isn't going, there was no way I could fit something like that as I want all the steelwork to remain standard.
Edited by Aubrey_Boy on 17th Oct, 2017. |
||||||
|
690 Posts Member #: 9962 Post Whore |
20th Nov, 2015 at 06:40:58pm
Some images from a different angle
Edited by Aubrey_Boy on 17th Oct, 2017. |
||||||
 3074 Posts Member #: 1348 Post Whore wakefield West Yorks |
20th Nov, 2015 at 07:14:24pm
Love your updates |
||||||
 510 Posts Member #: 1592 Smart Guy! mainland europe near ze germans |
21st Nov, 2015 at 02:51:51am
Love it when it looks stock bit really isn't! That sir, is not rust, it is the progressive mass reduction system
|
||||||
|
690 Posts Member #: 9962 Post Whore |
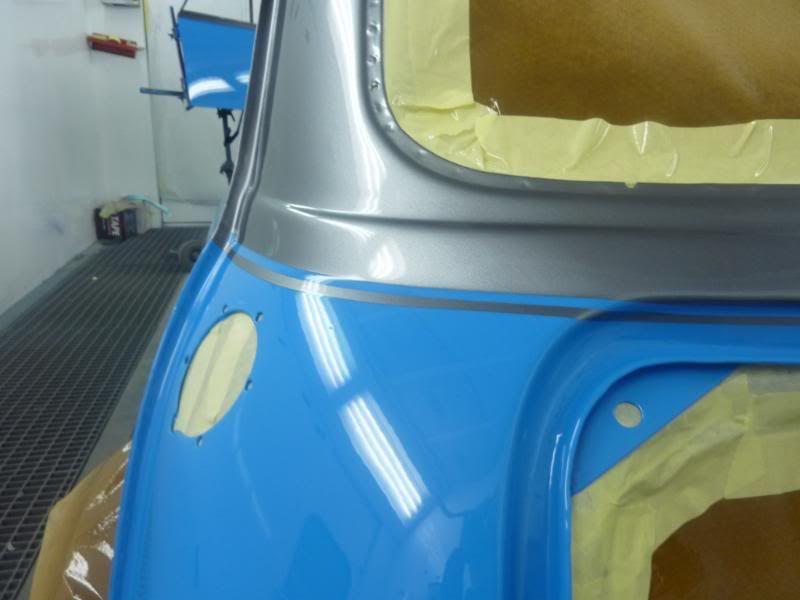
21st Nov, 2015 at 06:22:03pm
Before and after...
Edited by Aubrey_Boy on 17th Oct, 2017. |
||||||
|
690 Posts Member #: 9962 Post Whore |
24th Nov, 2015 at 08:16:03pm
More bolt on lightweightness.....
Edited by Aubrey_Boy on 17th Oct, 2017. |
||||||
 6748 Posts Member #: 828 Post Whore uranus |
24th Nov, 2015 at 08:58:52pm
lovely bit of kit Medusa + injection = too much torque for the dyno ..https://youtu.be/qg5o0_tJxYM |
||||||
 5417 Posts Member #: 6181 Double hard bastard brookwood woking |
24th Nov, 2015 at 09:26:54pm
Wow that looks good!! I have started posting on Instagram also my name on there is turbomk1golf
On 1st Nov, 2007 Ben H said:
There is no such thing as 'insignificant weight saving', it all adds up. |
||||||
|
690 Posts Member #: 9962 Post Whore |
25th Nov, 2015 at 06:42:56pm
I agree 100%, thanks again to Steve W |
||||||
|
2094 Posts Member #: 9894 Post Whore Dorking |
25th Nov, 2015 at 11:20:51pm
Yum yum! |
||||||
 656 Posts Member #: 1917 AKA chargedzetec Milton Keynes |
28th Nov, 2015 at 05:58:01pm
It does look good sitting on my window sill! can't wait to see how it looks on the car. This is FORD country, on a quiet day you can hear Vauxhalls rusting. |
||||||
|
690 Posts Member #: 9962 Post Whore |
29th Nov, 2015 at 08:54:18am
Steve. I'm sure it will fit like a glove like the rest of your stuff has, the new rear panel is heritage, the rear valance we moulded from is Heritage and they fit really nicely as steel panels when I mocked them up before I sent you the rear valance.
|
||||||
 180 Posts Member #: 1432 Advanced Member Kent |
29th Nov, 2015 at 02:52:16pm
This is by far one of my favorite builds on the net, along with Pauls. Hats off, level of work is excellent, seems well thought out, excellently executed, keep it up. Makes me want to pull my finger out and sort mine out, properly. |
||||||
 7265 Posts Member #: 1268 The Boom Boom speaker Police! Essex |
29th Nov, 2015 at 09:23:08pm
Amazing stuff. In the 13's at last!.. Just |
||||||
|
690 Posts Member #: 9962 Post Whore |
30th Nov, 2015 at 05:38:26am
Guys, thank you for the generous comments
|
||||||
|
180 Posts Member #: 1432 Advanced Member Kent |
5th Dec, 2015 at 11:18:55am
On 30th Nov, 2015 Aubrey_Boy said:
Guys, thank you for the generous comments Tomm, do you have a build thread? Cheers I haven't even started it yet, seems to boggle my somewhat basic mind when i look at it. Hoping to get it shot blasted in the new year and make a start. http://www.turbominis.co.uk/forums/index.php?p=vt&tid=587374 |
||||||
|
690 Posts Member #: 9962 Post Whore |
26th Dec, 2015 at 07:10:18pm
Unfortunately I've been out of action for too long now and it's likely to be a week or two yet, but I'm eager to get back on it.
Edited by Aubrey_Boy on 4th Jul, 2017. |
||||||
| Home > Show Us Yours! > Project "Marginal gains..." | |||||||
|
|||||||


| Page: |