
| Page: |
| Home > Show Us Yours! > Project "Marginal gains..." | |||||||
 7265 Posts Member #: 1268 The Boom Boom speaker Police! Essex |
29th Jan, 2014 at 09:06:57pm
Lovely job, as expected. In the 13's at last!.. Just |
||||||
 690 Posts Member #: 9962 Post Whore |
30th Jan, 2014 at 06:42:42pm
Cheers mate,
Edited by Aubrey_Boy on 30th Jan, 2014. |
||||||
 4890 Posts Member #: 1775 Post Whore Chester |
30th Jan, 2014 at 08:23:11pm
Nice I run a supercharger and I don't care the TB is on the wrong side.
|
||||||
|
690 Posts Member #: 9962 Post Whore |
8th Feb, 2014 at 09:00:46am
Cheers mate,
Edited by Aubrey_Boy on 13th Jul, 2017. |
||||||
 562 Posts Member #: 9285 Post Whore Oxfordshire |
8th Feb, 2014 at 09:17:17am
Looking great! Primary designs are a few minutes up the road from me. My build thread: http://www.turbominis.co.uk/forums/index.php?p=vt&tid=454802
|
||||||
 1767 Posts Member #: 9165 Previously josh4444 Australia, brisbane |
8th Feb, 2014 at 10:29:02am
look forward to seeing this come together it looks like it will be superb |
||||||
 8297 Posts Member #: 408 Turbo Love Palace Fool Aylesbury |
8th Feb, 2014 at 02:40:48pm
A guy at my work has just started at primary designs, apparently they only started the new exhausts for the F1 season a few weeks ago. Talk about cutting it fine!
https://www.facebook.com/pages/Fusion-Fabri..._homepage_panel
|
||||||
|
690 Posts Member #: 9962 Post Whore |
3rd Mar, 2014 at 09:06:07pm
Cheers Matty,
Edited by Aubrey_Boy on 13th Jul, 2017. |
||||||
|
4890 Posts Member #: 1775 Post Whore Chester |
3rd Mar, 2014 at 09:10:15pm
Nice, it's giving me the horn. I run a supercharger and I don't care the TB is on the wrong side.
|
||||||
|
1767 Posts Member #: 9165 Previously josh4444 Australia, brisbane |
4th Mar, 2014 at 08:52:16am
thank manifold looks the bomb!!
|
||||||
|
690 Posts Member #: 9962 Post Whore |
4th Mar, 2014 at 12:43:56pm
Thanks guys!
|
||||||
|
690 Posts Member #: 9962 Post Whore |
4th Mar, 2014 at 12:43:58pm
.. Edited by Aubrey_Boy on 13th Jul, 2017. |
||||||
|
72 Posts Member #: 8845 Advanced Member |
4th Mar, 2014 at 02:40:06pm
still using the internal gate? Always used to be able to get pretty good control with the VF's just using a 3 port solenoid anyway. |
||||||
|
690 Posts Member #: 9962 Post Whore |
4th Mar, 2014 at 06:46:22pm
Hi Alex,
Edited by Aubrey_Boy on 4th Mar, 2014. |
||||||
|
72 Posts Member #: 8845 Advanced Member |
5th Mar, 2014 at 08:05:01am
F1 season now huh! you'll have to wait until winter lol.
|
||||||
|
690 Posts Member #: 9962 Post Whore |
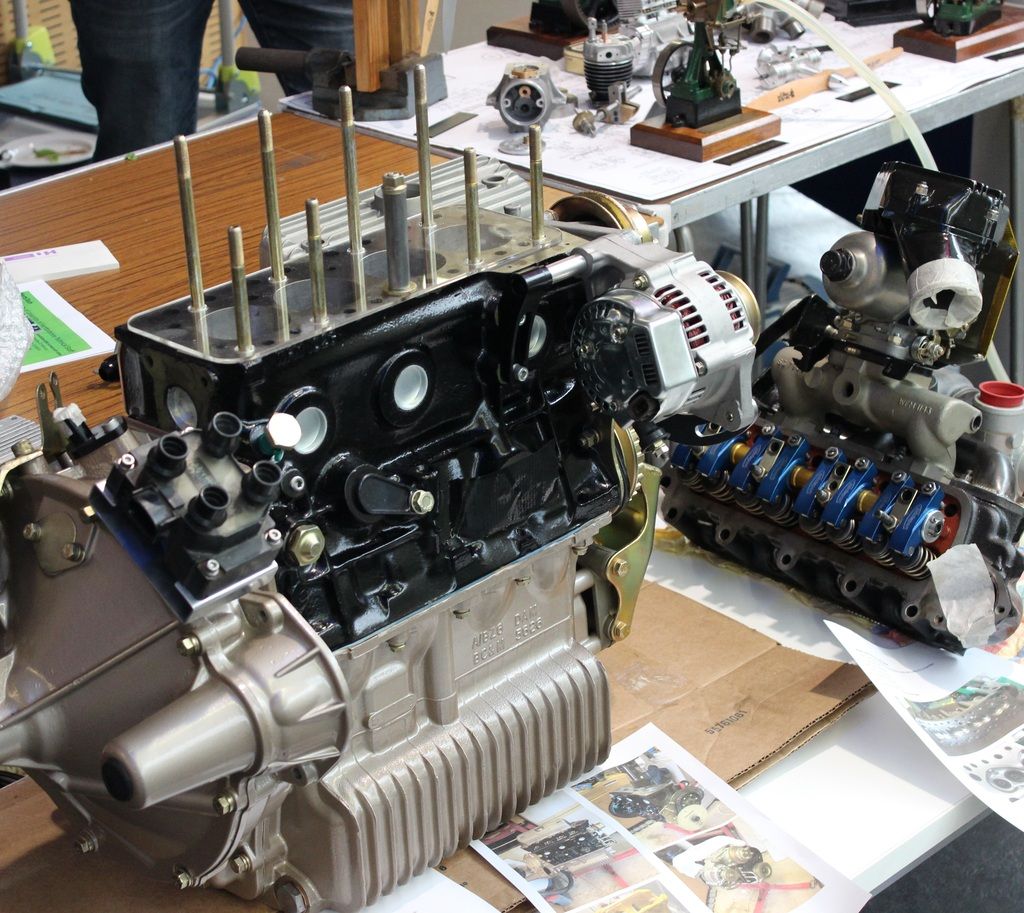
13th Mar, 2014 at 08:48:29pm
Time to trial in the car again:
Edited by Aubrey_Boy on 13th Jul, 2017. |
||||||
 882 Posts Member #: 9774 Post Whore Buckinghamshire |
13th Mar, 2014 at 09:02:25pm
That's a work of art. http://www.turbominis.co.uk/forums/index.p...tid=469104&fr=0 |
||||||
|
Forum Mod 10980 Posts Member #: 17 ***16*** SouthPark, Colorado |
13th Mar, 2014 at 09:36:13pm
Wow, That is a nice looking manifold....
On 17th Nov, 2014 Tom Fenton said:
Sorry to say My Herpes are no better Ready to feel Ancient ??? This is 26 years old as of 2022 https://youtu.be/YQQokcoOzeY |
||||||
|
Forum Mod 10980 Posts Member #: 17 ***16*** SouthPark, Colorado |
13th Mar, 2014 at 09:40:16pm
On 10th Oct, 2013 Aubrey_Boy said:
The top wishbones are nearly done now too, I didn't want to commit to the lower damper mount position until I had the correct wishbones fitted so I can place it where I want - so the clevis is still to be done. 
So, I do have a question about this... The bottom-most section welded to the angle. Is this a solid bar that you bored out on the left side, or was it a tube that you dropped a solid bung into and plug welded? Just curious.... On 17th Nov, 2014 Tom Fenton said:
Sorry to say My Herpes are no better Ready to feel Ancient ??? This is 26 years old as of 2022 https://youtu.be/YQQokcoOzeY |
||||||
|
Forum Mod 10980 Posts Member #: 17 ***16*** SouthPark, Colorado |
13th Mar, 2014 at 09:50:07pm
On 12th Oct, 2013 Aubrey_Boy said:
Hi Vegar, Thank you for your comments Next to simulating the kinematic geometry the analysis of how the forces which are fed into the frame from the suspension links has been where most of my time has been spent. I have looked at 0.9g braking, 0,9g cornering and forward acceleration. Without question the braking loadcase is the worst for the loads fed into the subframe. Under braking the lower wishbone has the highest force - but is in the highest stiffness / strength area for the subframe - so not a problem, the upper wishbone still has reasonably high load and as you state will try to twist vertical leg of the subframe. Yes I calculated the amount the twist in this tube based on the tube diameter / thickness and length of the tube and material but with some assumptions such as the twists about its centre, the effect of the welding heat on the stiffness / strength of the tube etc... So yes I have considered this but all relies on my assumptions being somewhere near right. I have always planned to add to this area of the subframe once everything is installed - so many things (Gearbox protrusions, gear linkage, starter motor, steering rack) all get in the way of putting nicely placed tubes from this area back to other stiff areas in the frame. It all stems from keeping a standard length front end, move the engine forward 40 - 50mm and this area is much easier to resolve, I know of one type of frame manufactured which uses a similar top arm layout and has been used for a number of years. This is an AMT frame 
Running the same simulations but using the AMT frame hard points (essentially standard Mini in terms of the way the loads are distributed) for suspension parts I have a good idea of the sort of deflections this frame has as a benchmark. I have already done some 'ugly bar tests' - to visually see what moves and where - which lead to me adding the lower mount in the middle of the subframe which bolts to the tunnel area So in summary I agree completely with what you are saying and do plan to add to this area Cheers I know someone who fitted one of the AMT (RACE) frames many years ago, and those top arms were like they were made from toffee they bent so easily. I recall the narrow span was part of the problem, but also the combined loading of braking, bump, and cornering, combined with the spring being offset to one side (per RichSpec's picture). The guy who's frame it was ended up re-designing many characteristics of the top arm (luckilly he was a genius in pretty much all engineering aspects so was no great problem analysing and re-designing it). It was so long ago, I've forgotten what the changes were he made, but I'll get him to take a picture of it and I'll post it up as a reference. Also, I can't help but feel that 0.9g is barely sufficient for designing to... I know you can easily pull more than that on a track when wearing slicks, both braking and cornering. Factor in bump loads as well, and you might come up a little short. Last thing you ever want, is for the top arm to pop while braking hard. I'd have used 1.2g as target personally, and maybe 1.3g for a little more safety factor. Edited by TurboDave16V on 13th Mar, 2014. On 17th Nov, 2014 Tom Fenton said:
Sorry to say My Herpes are no better Ready to feel Ancient ??? This is 26 years old as of 2022 https://youtu.be/YQQokcoOzeY |
||||||
|
690 Posts Member #: 9962 Post Whore |
13th Mar, 2014 at 11:47:45pm
Thanks for the comments guys,
Edited by Aubrey_Boy on 3rd Dec, 2014. |
||||||
|
Forum Mod 10980 Posts Member #: 17 ***16*** SouthPark, Colorado |
14th Mar, 2014 at 12:43:09am
Clearly well thought out; looks like you've done your homework for sure.
On 17th Nov, 2014 Tom Fenton said:
Sorry to say My Herpes are no better Ready to feel Ancient ??? This is 26 years old as of 2022 https://youtu.be/YQQokcoOzeY |
||||||
|
690 Posts Member #: 9962 Post Whore |
14th Mar, 2014 at 10:06:39am
I agree totally about that part of the upper arm looking like a tube :) To the extent where I kept looking at the picture you reposted and thought "he did make the bushes as I drew them, didn't he? - or am I going mad, I'm sure he did :) " Causing me to go and get one of the wishbones to check and yes it's all turned from solid.
Edited by Aubrey_Boy on 3rd Dec, 2014. |
||||||
|
Forum Mod 10980 Posts Member #: 17 ***16*** SouthPark, Colorado |
14th Mar, 2014 at 10:20:50am
That's funny about the tube bushing.... I made you even doubt yourself!
On 17th Nov, 2014 Tom Fenton said:
Sorry to say My Herpes are no better Ready to feel Ancient ??? This is 26 years old as of 2022 https://youtu.be/YQQokcoOzeY |
||||||
|
690 Posts Member #: 9962 Post Whore |
14th Mar, 2014 at 07:16:04pm
This is the shear panel I have added it has 6 dowelled fixings, the main purpose was to tie the lower wishbone mounting points together as shown by the red lines as there is not much in the way of lateral connection between the two halves of the frame. I did it after deciding to go the turbo route but I want to test with and without it to see if I can feel a difference.
Edited by Aubrey_Boy on 13th Jul, 2017. |
||||||
| Home > Show Us Yours! > Project "Marginal gains..." | |||||||
|
|||||||


 [/url]


 [/url]


| Page: |