| Page: |
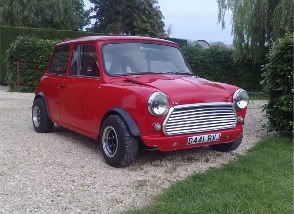
| Home > Show Us Yours! > Miglia engined road mini - slowly getting there | |||||||
 834 Posts Member #: 2017 Post Whore Warwick. |
1st Feb, 2009 at 04:52:10pm
Are they from an RX7? sure i knew someone who had similar headrests on there seat n was from a Mazda David. |
||||||
|
8604 Posts Member #: 573 Formerly Axel Podland |
1st Feb, 2009 at 04:58:33pm
Is that a panther black Fez? I'm planning to get one of them in March. 1.6 Diesel Zetec. Saul Bellow - "A great deal of intelligence can be invested in ignorance when the need for illusion is deep."
|
||||||
|
203 Posts Member #: 479 Senior Member |
1st Feb, 2009 at 04:59:55pm
Its dark blue, not sure what its actually called. And it is a 1.6 Tdci Zetec.
|
||||||
|
8604 Posts Member #: 573 Formerly Axel Podland |
1st Feb, 2009 at 05:02:44pm
On 1st Feb, 2009 Timinichelsea said:
Its dark blue, not sure what its actually called. And it is a 1.6 Tdci Zetec. Sorry to go off topic. Is the 1.6 Tdci really that slow? Saul Bellow - "A great deal of intelligence can be invested in ignorance when the need for illusion is deep."
|
||||||
|
203 Posts Member #: 479 Senior Member |
1st Feb, 2009 at 05:26:58pm
Well compared to my MG ZR yes - but in reality no it ain't too bad. Its slow off the line but once its into 3rd it starts to fly along, it'll comfortably sit at 80 on the motorway and i've had it up to ninety but that was starting to feel quick.
|
||||||
|
559 Posts Member #: 2775 Post Whore Aberdeen |
1st Feb, 2009 at 08:35:06pm
Are the seats from a SMART car?
|
||||||
|
8604 Posts Member #: 573 Formerly Axel Podland |
1st Feb, 2009 at 08:47:24pm
On 1st Feb, 2009 Timinichelsea said:
Well compared to my MG ZR yes - but in reality no it ain't too bad. Its slow off the line but once its into 3rd it starts to fly along, it'll comfortably sit at 80 on the motorway and i've had it up to ninety but that was starting to feel quick. Dont get me wrong its a nice car, comfortable quiet economical and cheap to run, but it isn't exciting to drive - I have minis for that! Thanks, I can put up with it being slow off the line at my age. Saul Bellow - "A great deal of intelligence can be invested in ignorance when the need for illusion is deep."
|
||||||
|
458 Posts Member #: 1840 Senior Member Kings Lynn, Norfolk |
1st Feb, 2009 at 08:47:39pm
Looking good, recognise the seats but don't know where from.
|
||||||
|
203 Posts Member #: 479 Senior Member |
1st Feb, 2009 at 09:00:23pm
On 1st Feb, 2009 lockfast said:
Are the seats from a SMART car? Do we get a prize for guessing correctly? And we have a winner. They are welded to the inner and outer sills and also tied fixed to the floor pan |
||||||
|
203 Posts Member #: 479 Senior Member |
22nd Feb, 2009 at 07:20:30pm
Ok last few weeks i haven't made a lot of progress, ben working a lot, so this weekend i did a bit more, but i wasn't really in the mood.
|
||||||
|
203 Posts Member #: 479 Senior Member |
3rd May, 2009 at 08:27:25pm
Yet another few months have passed and i've just managed to get a bit more done. I took some photos but left my camera back at the garage.
|
||||||
|
203 Posts Member #: 479 Senior Member |
4th May, 2009 at 06:42:48pm
Pictures as promised. |
||||||
|
203 Posts Member #: 479 Senior Member |
4th May, 2009 at 06:46:33pm
Had to modify the clutch pedal today, now it sits level with the brake.
|
||||||
 9317 Posts Member #: 59 First mini turbo to get in the 12's & site perv Herefordshire |
4th May, 2009 at 06:49:26pm
Looking very good
|
||||||
|
203 Posts Member #: 479 Senior Member |
4th May, 2009 at 06:55:40pm
its a .625, if i dont like it its easy to swap to a different bore
|
||||||
|
4314 Posts Member #: 700 Formerly British Open Classic The West Country |
4th May, 2009 at 07:05:50pm
Looking good.
Isambard Kingdom Brunel said:
Nothing is impossible if you are an Engineer |
||||||
|
203 Posts Member #: 479 Senior Member |
4th May, 2009 at 07:18:07pm
they are the reinforcement for the sill stands.
|
||||||
|
203 Posts Member #: 479 Senior Member |
9th Aug, 2009 at 08:53:03pm
So yet again another few months have passed.
|
||||||
|
203 Posts Member #: 479 Senior Member |
9th Aug, 2009 at 08:56:29pm
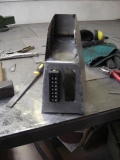
Once the seats were in, i could start positioning everything else. I started with the gear change. I had to make a tower for this, which took quite a while and is still not finished.
|
||||||
|
203 Posts Member #: 479 Senior Member |
9th Aug, 2009 at 08:59:50pm
From that point i could do the steering wheel position, unfortunately i left my camera at home and had to use my phone so the pics are bad. |
||||||
|
203 Posts Member #: 479 Senior Member |
9th Aug, 2009 at 09:04:07pm
I really dont like the standard steering position, so it now has a tube in place of the lower dash bar and from this the column can be attached, then via the use of a couple of universal joints i can get a steering position i like.
|
||||||
 9317 Posts Member #: 59 First mini turbo to get in the 12's & site perv Herefordshire |
9th Aug, 2009 at 10:22:38pm
I like the idea of mounting all the switches etc on the gear tower, I might pilfer that one day |
||||||
 16540 Posts Member #: 4241 King Gaycharger, butt plug dealer, Sheldon Cooper and a BAC but generally a niceish fella if you dont mind a northerner Rotherham, South Yorkshire |
10th Aug, 2009 at 08:05:50am
Looking good. I like your gear stick.... On 11th Feb, 2015 robert said:
i tried putting soap on it , and heating it to brown , then slathered my new lube on it 
|
||||||
|
203 Posts Member #: 479 Senior Member |
10th Aug, 2009 at 09:06:02pm
hehe, the 'gear stick' is actually my torch, i just stuck it in there as i was playing with different heights for the stick.
|
||||||
|
203 Posts Member #: 479 Senior Member |
23rd Aug, 2009 at 09:16:13pm
Got home from work early today so i managed to get some stuff done.
|
||||||
| Home > Show Us Yours! > Miglia engined road mini - slowly getting there | |||||||
|
|||||||
| Page: |


